
Introduction
This article explains how to build a reverse proxy server with nginx, create an SSL certificate, and communicate over HTTPS.
Prerequisites
What is nginx?
nginx is a free and open source web server. It is developed with a focus on performance, high concurrency, and low memory usage. It also provides reverse proxy functionality for HTTP, HTTPS, SMTP, POP3, and IMAP, as well as load balancing and HTTP caching. https://www.nginx.co.jp
What is a reverse proxy?
A reverse proxy is a proxy server placed in front of a specific server so that requests to that server always pass through it. Unlike a general proxy, it is dedicated to the target server and is prepared for access from an unspecified number of clients. For clients, it acts as the service endpoint, and they are normally unaware of the reverse proxy. Reverse proxies are used to control access from clients and distribute server load. https://ja.wikipedia.org/wiki/reverse proxy
What is HTTP?
Hypertext Transfer Protocol (HTTP) is a communication protocol primarily used by web browsers to communicate with web servers, and is part of the Internet Protocol Suite. It is used to send and receive content such as web pages written in HTML. https://developer.mozilla.org/ja/docs/Web/HTTP
What is HTTPS?
HTTPS (Hypertext Transfer Protocol Secure) is a protocol and URI scheme for securing HTTP communication. Strictly speaking, HTTPS itself is not a protocol; HTTP communication over a secure connection provided by SSL/TLS is called HTTPS. https://developer.mozilla.org/ja/docs/Glossary/https
What is SSL/TLS?
Transport Layer Security (TLS) is a protocol used when secure communication is required on computer networks such as the Internet. Its main functions include authenticating communication partners, encrypting communication content, and detecting tampering. TLS was developed by the IETF. This protocol is often referred to as SSL (Secure Sockets Layer) unless a distinction is needed, because TLS is based on SSL and the name SSL is widely used. https://www.soumu.go.jp/main_sosiki/joho_tsusin/security_previous/kiso/k01_ssl.htm
What is a domain?
A domain can be compared to an “address on the Internet.” This information is required to identify a destination when you send email or visit a website. For example, if the URL is “https://www.onamae.com/”, the domain name is “onamae.com”. https://www.onamae.com/clever/about/domain.html
Building CentOS8
See the article below to build and start a minimal CentOS 8 environment. In this article, the host name is “ReverseProxyServer”.
Installing and starting nginx
Install nginx
Enter the following command to install nginx.
[root@ReverseProxyServer ~]# dnf -y install nginxStart nginx
Enter the following command to start nginx.
[root@ReverseProxyServer ~]# systemctl enable nginx
[root@ReverseProxyServer ~]# systemctl start nginx
Confirm nginx startup
Enter the following command to confirm that nginx is running.
[root@ReverseProxyServer ~]# systemctl status nginx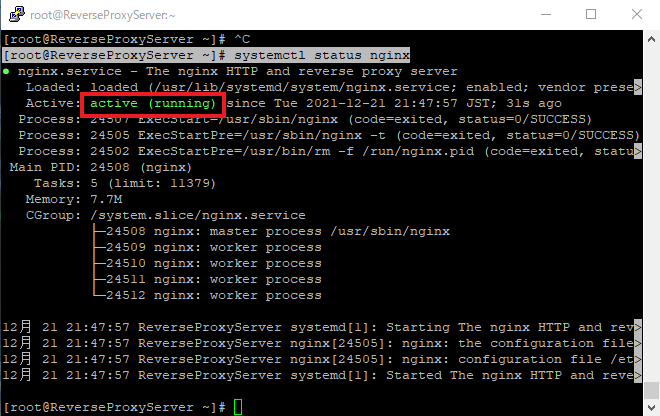
Firewall
Firewall settings
Enter the following command to allow HTTP traffic through the firewall.
*--add-service=http opens the HTTP service, and --permanent makes the change persistent.
[root@ReverseProxyServer ~]# firewall-cmd --add-service=http --permanent
[root@ReverseProxyServer ~]# firewall-cmd --reload
Check the firewall
Enter the following command to confirm that the firewall settings are complete.
[root@ReverseProxyServer ~]# firewall-cmd --list-all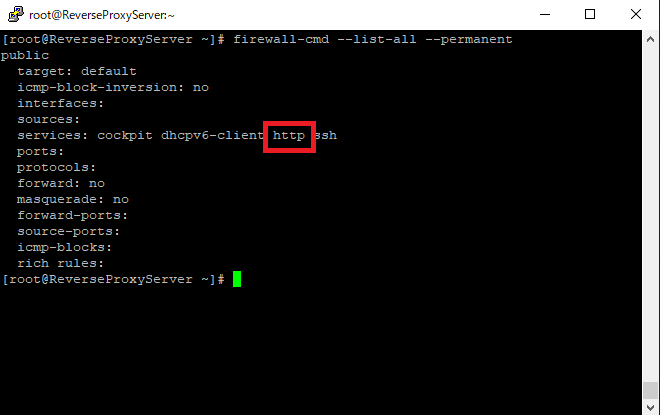
Check from a browser
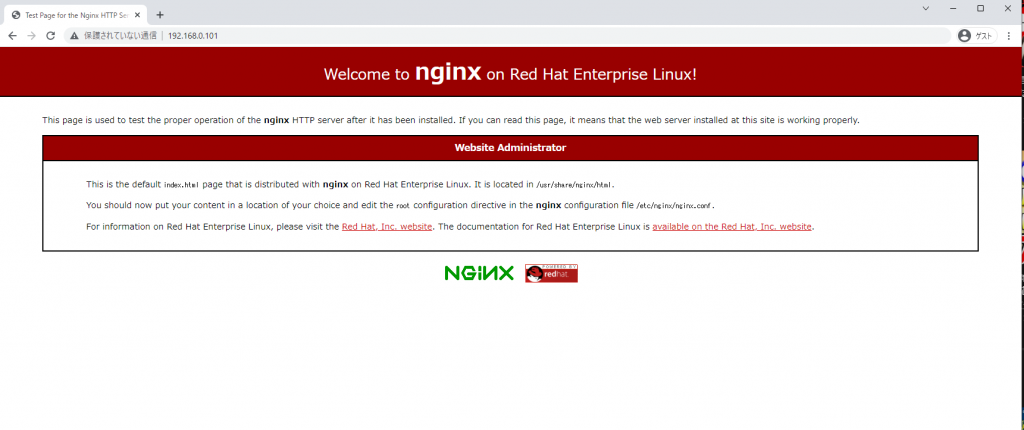
Enter “http://reverse proxy server IP address” in your browser and confirm that you can access the site.
Configuring reverse proxy
Configuring reverse proxy
- Enter the command below and move to the directory where the configuration file will be saved.
[root@ReverseProxyServer ~]# cd /etc/nginx/conf.d- Enter the following command to create the configuration file.
[root@ReverseProxyServer ~]# vi reverseproxy.conf- Write the following content in the configuration file. In this example, the reverse proxy forwards requests to Google.
server {
  listen 80;
  server_name IP address of this server;

  proxy_set_header X-Real-IP $remote_addr;
  proxy_set_header X-Forwarded-Proto $scheme;
  proxy_set_header X-Forwarded-For $proxy_add_x_forwarded_for;
  proxy_set_header Host $host;


  location / {
    proxy_pass https://www.google.com;
  }
}
Check from a browser
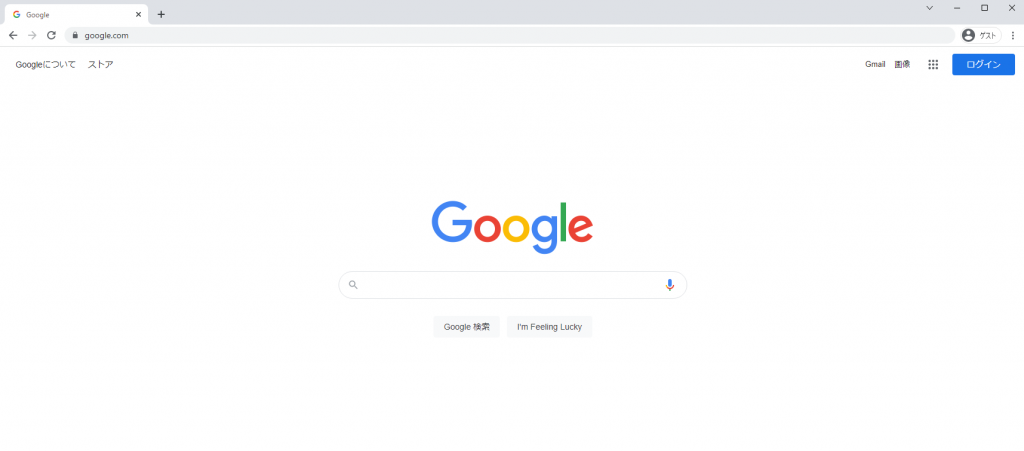
Enter “http://reverse proxy server IP address” in the browser again and confirm that the Google homepage opens instead of the nginx page.
Enabling SSL
To complete this section, you need a domain. Acquire a domain from a registrar such as Google Domains or Onamae.com before continuing. Domain registration usually requires a fee.
Installing certbot
Enter the command below to install certbot.
*Because certbot is not in the default repository, install the epel-release repository first.
[root@ReverseProxyServer ~]# dnf -y install epel-release
[root@ReverseProxyServer ~]# dnf -y install certbot python3-certbot-nginx
Edit config
Execute the following command and change server_name from the server IP address to your domain.
[root@ReverseProxyServer ~]# vi /etc/nginx/conf.d/reverseproxy.conf

server {
  listen 80;
  server_name own domain; ←Edit here

  proxy_set_header X-Real-IP $remote_addr;
  proxy_set_header X-Forwarded-Proto $scheme;
  proxy_set_header X-Forwarded-For $proxy_add_x_forwarded_for;
  proxy_set_header Host $host;


  location / {
    proxy_pass https://www.google.com;
  }
}
Open the port
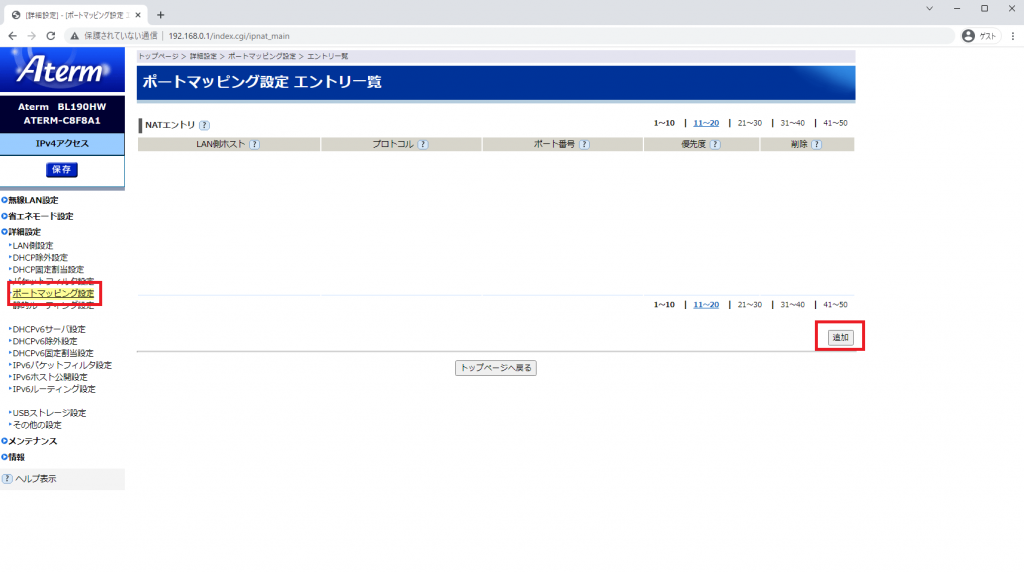
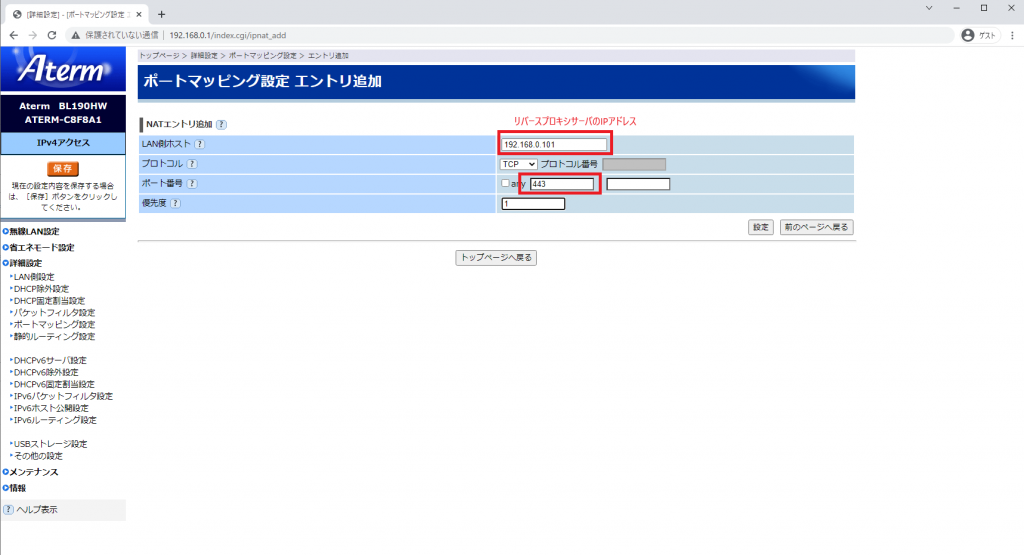
Access your router and open port 443 for this server. *As an example, the procedure for opening a port on an Aterm router is shown below. Router settings differ by environment, so check the procedure for your own router. Note: Opening the port allows access from an unspecified number of people. Understand the risks and proceed at your own risk.
Certificate issuance
Execute the following command to issue an SSL certificate.
[root@ReverseProxyServer ~]# certbot --nginx

Enter email address (used for urgent renewal and security notices)
 (Enter 'c' to cancel): Enter your email address

- - - - - - - - - - - - - - - - - - - - - - - - - - - - - - - - - - - - - - - -
Please read the Terms of Service at
https://letsencrypt.org/documents/LE-SA-v1.2-November-15-2017.pdf. You must
agree in order to register with the ACME server at
https://acme-v02.api.letsencrypt.org/directory
- - - - - - - - - - - - - - - - - - - - - - - - - - - - - - - - - - - - - - - -
(Y)es/(N)o: Y ← If you agree, enter Y


- - - - - - - - - - - - - - - - - - - - - - - - - - - - - - - - - - - - - - - -
Would you be willing, once your first certificate is successfully issued, to
share your email address with the Electronic Frontier Foundation, a founding
partner of the Let's Encrypt project and the non-profit organization that
develops Certbot? We'd like to send you email about our work encrypting the web,
EFF news, campaigns, and ways to support digital freedom.
- - - - - - - - - - - - - - - - - - - - - - - - - - - - - - - - - - - - - - - -
(Y)es/(N)o: N ← This asks whether EFF may send email to the address you entered.

Please choose whether or not to redirect HTTP traffic to HTTPS, removing HTTP access.
- - - - - - - - - - - - - - - - - - - - - - - - - - - - - - - - - - - - - - - -
1: No redirect - Make no further changes to the webserver configuration.
2: Redirect - Make all requests redirect to secure HTTPS access. Choose this for
new sites, or if you're confident your site works on HTTPS. You can undo this
change by editing your web server's configuration.
- - - - - - - - - - - - - - - - - - - - - - - - - - - - - - - - - - - - - - - -
Select the appropriate number [1-2] then [enter] (press 'c' to cancel): 2
Redirecting all traffic on port 80 to ssl in /etc/nginx/conf.d/default.conf

IMPORTANT NOTES:
 - Unable to install the certificate
 - Congratulations! Your certificate and chain have been saved at:
   /etc/letsencrypt/live/*****/fullchain.pem
   Your key file has been saved at:
   /etc/letsencrypt/live/****/privkey.pem
   Your cert will expire on 2020-12-31. To obtain a new or tweaked
   version of this certificate in the future, simply run certbot again
   with the "certonly" option. To non-interactively renew *all* of
   your certificates, run "certbot renew"
 - Your account credentials have been saved in your Certbot
   configuration directory at /etc/letsencrypt. You should make a
   secure backup of this folder now. This configuration directory will
   also contain certificates and private keys obtained by Certbot so
   making regular backups of this folder is ideal.
Edit config
Enter the following command to edit the reverse proxy configuration file and enable SSL.
[root@ReverseProxyServer ~]# vi /etc/nginx/conf.d/reverseproxy.conf

server {
  listen 80;
  server_name own domain name;

  rewrite ^(.*)$ https://$host$1 permanent;
}

server {
  listen 443 ssl;
  server_name own domain name;

  ssl_certificate /etc/letsencrypt/live/your domain name/fullchain.pem;
  ssl_certificate_key /etc/letsencrypt/live/your domain name/privkey.pem;

  proxy_set_header X-Real-IP $remote_addr;
  proxy_set_header X-Forwarded-Proto $scheme;
  proxy_set_header X-Forwarded-For $proxy_add_x_forwarded_for;
  proxy_set_header Host $host;

  location / {
    proxy_pass https://www.google.com;
  }
}
Firewall settings
Enter the following command to set up the https firewall.
[root@ReverseProxyServer ~]# firewall-cmd --add-service=https --permanent
[root@ReverseProxyServer ~]# firewall-cmd --reload
Check the firewall
Enter the following command to check the firewall settings.
[root@ReverseProxyServer ~]# firewall-cmd --list-all --permanent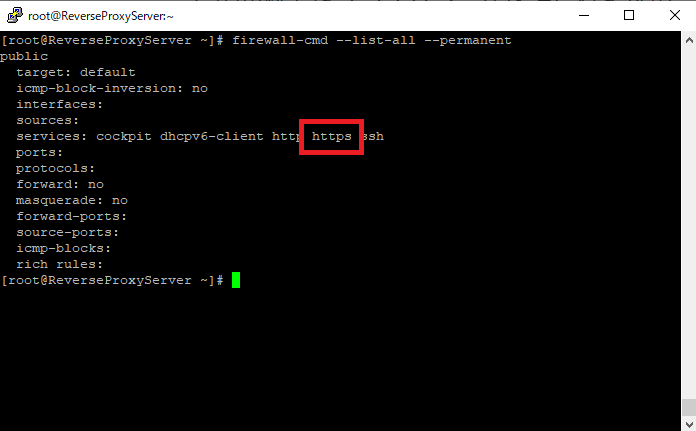
Check from a browser
- Enter “https://reverse proxy server IP address” in your browser to access.
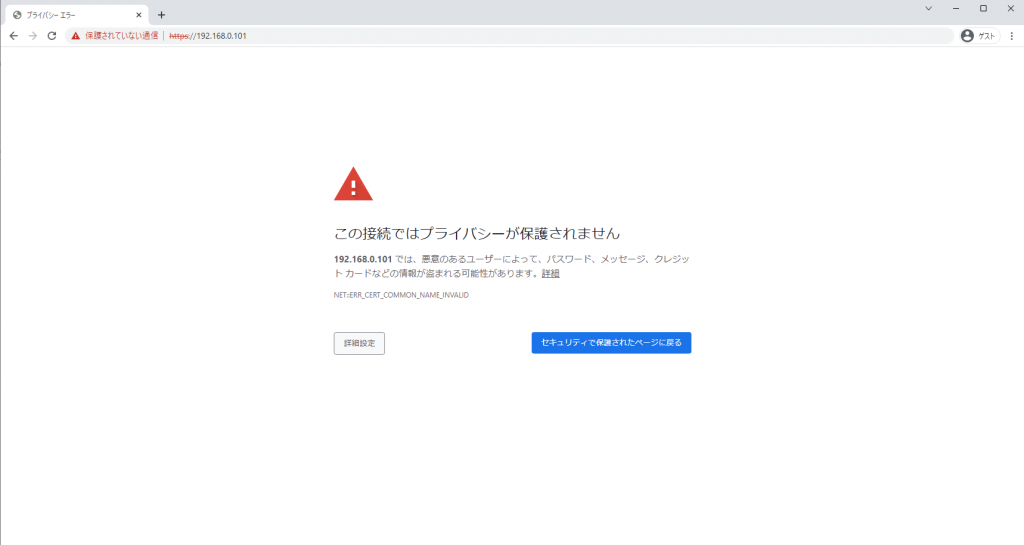
- Click “Advanced settings” → “Access site” and confirm that Google’s homepage opens.
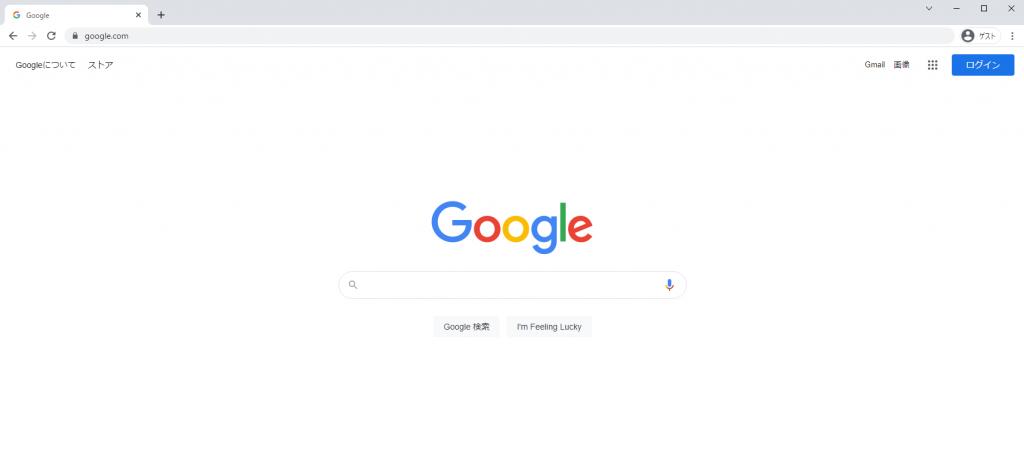
*If the domain resolves to the global IP address of this server, you can access it from an external network with “https://your domain name”.
You have now built a reverse proxy server and enabled SSL.
Conclusion
This article introduced how to build a reverse proxy server and enable SSL. In the future, when you create an application server, configure access through this reverse proxy server.
Opening router ports allows access from outside the network. Research the required port settings for your environment and understand the risks before building a public-facing service.