
Introduction
This article explains how to use multiple local models from a web UI with llama-cpp-python and Chatbot UI. The environment is built with Docker.
Prerequisite knowledge
llama-cpp-python
“llama-cpp-python” is a Python binding for the “llama.cpp” library by ggerganov. This package provides low-level access to a C API and a high-level Python API for text completion. It also provides an OpenAI-compatible web server for local Copilot replacement, function calls, vision API support, and multiple model support. Detailed documentation is available on the llama-cpp-python ReadTheDocs page.
Chatbot UI
“Chatbot UI” is an advanced chatbot interface designed for OpenAI’s chat model. It uses Next.js, TypeScript, and Tailwind CSS and supports features such as prompt templates, response editing, and GPT-4 integration. It emphasizes customization and flexibility, allowing developers to easily modify the chat and system interface.
How to use multiple models with llama-cpp-python
First, I will briefly explain how to use multiple models with llama-cpp-python. The actual steps start in the “Building llama-cpp-python” section. Feel free to skip this section.
llama-cpp-python provides an OpenAI-compatible API server called llama-cpp-python[server] (hereinafter lcp[server]). With this feature, you can use a local LLM in the same way as OpenAI’s official API.
In December of last year, an update added support for multiple models. ([Feat] Multi model support #931)
The steps below are based on the official documentation.
Previously, when using a model with llama-cpp-python, you started it with the following command.
python3 -m llama_cpp.server --model <model name> --chat_format <chat format>To use multiple models, first create a JSON file like the one below. Refer to the official documentation for the variables that can be used in each model definition.
{
    "host": "0.0.0.0",
    "port": 8000,
    "models": [
        {
            "model": "Path of the first model",
            "model_alias": "1st model name",
            "chat_format": "Chat format",
            "n_gpu_layers": -1,
            "offload_kqv": true,
            "n_threads": 12,
            "n_batch": 512,
            "n_ctx": 2048
        },
        {
            "model": "Second model path",
            "model_alias": "Second model name",
            "chat_format": "Chat format",
            "n_gpu_layers": -1,
            "offload_kqv": true,
            "n_threads": 12,
            "n_batch": 512,
            "n_ctx": 2048
        },
    ]
}
After creating the JSON file, start lcp[server] with --config_file instead of --model to use multiple models.
python3 -m llama_cpp.server --config_file <config_file>Building llama-cpp-python
This section shows how to build llama-cpp-python with Docker.
-
First, place the models you want to use in any directory. The models must be in GGUF format.
-
Next, as introduced in the previous section, create a JSON file for multiple models and place it in the same directory as the models. This example uses three models: “ELYZA Japanese LLaMA 2 7b”, “ELYZA Japanese CodeLLaMA 7b”, and “LLaMA 2 13b”.
{
    "host": "0.0.0.0",
    "port": 8000,
    "models": [
        {
            "model": "/models/ELYZA-japanese-Llama-2-7b-fast-instruct-q5_K_M.gguf",
            "model_alias": "ELYZA-Llama-2-7b-fast",
            "chat_format": "llama-2",
            "n_gpu_layers": -1,
            "offload_kqv": true,
            "n_threads": 12,
            "n_batch": 512,
            "n_ctx": 2048
        },
        {
            "model": "/models/ELYZA-japanese-CodeLlama-7b-instruct-q4_K_S.gguf",
            "model_alias": "ELYZA-CodeLlama-7b",
            "chat_format": "llama-2",
            "n_gpu_layers": -1,
            "offload_kqv": true,
            "n_threads": 12,
            "n_batch": 512,
            "n_ctx": 2048
        },
        {
            "model": "/models/llama-2-13b.Q2_K.gguf",
            "model_alias": "llama-2-13b",
            "chat_format": "llama-2",
            "n_gpu_layers": -1,
            "offload_kqv": true,
            "n_threads": 12,
            "n_batch": 512,
            "n_ctx": 2048
        }
    ]
}- The current directory looks like this:
PS C:\Users\mune0\llama-cpp-python\models> ls


    Directory: C:\Users\mune0\llama-cpp-python\models


Mode                 LastWriteTime         Length Name
----                 -------------         ------ ----
-a----        2024/03/10      2:23     3856831168 ELYZA-japanese-CodeLlama-7b-instruct-q4_K_S.gguf
-a----        2024/03/11     10:51     4863972096 ELYZA-japanese-Llama-2-7b-fast-instruct-q5_K_M.gguf
-a----        2024/03/11      9:53     5429348224 llama-2-13b.Q2_K.gguf
-a----        2024/03/11     11:54           1083 model_config.json


PS C:\Users\mune0\llama-cpp-python\models>- Build lcp[server] with Docker using the command below. This example uses the official Docker image published to GHCR.
docker run --rm -it -p 8000:8000 -v <Directory where the model is located>:/models -e CONFIG_FILE=/models/model_config.json ghcr.io/abetlen/llama-cpp-python:latest- On startup, output like the following is displayed.
If
INFO: Uvicorn running on http://0.0.0.0:8000 (Press CTRL+C to quit)is displayed, the server started successfully.
Try increasing RLIMIT_MEMLOCK ('ulimit -l' as root).
.................................................................................................
llama_new_context_with_model: n_ctx      = 2048
llama_new_context_with_model: freq_base  = 10000.0
llama_new_context_with_model: freq_scale = 1
llama_kv_cache_init:        CPU KV buffer size =  1024.00 MiB
llama_new_context_with_model: KV self size  = 1024.00 MiB, K (f16):  512.00 MiB, V (f16):  512.00 MiB
llama_new_context_with_model:        CPU input buffer size   =    13.02 MiB
llama_new_context_with_model:        CPU compute buffer size =   160.00 MiB
llama_new_context_with_model: graph splits (measure): 1
AVX = 1 | AVX_VNNI = 0 | AVX2 = 1 | AVX512 = 0 | AVX512_VBMI = 0 | AVX512_VNNI = 0 | FMA = 1 | NEON = 0 | ARM_FMA = 0 | F16C = 1 | FP16_VA = 0 | WASM_SIMD = 0 | BLAS = 0 | SSE3 = 1 | SSSE3 = 1 | VSX = 0 | MATMUL_INT8 = 0 |
Model metadata: {'general.file_type': '17', 'tokenizer.ggml.unknown_token_id': '0', 'tokenizer.ggml.eos_token_id': '2', 'general.architecture': 'llama', 'llama.context_length': '4096', 'general.name': 'ELYZA-japanese-Llama-2-7b-fast-instruct', 'general.source.huggingface.repository': 'elyza/ELYZA-japanese-Llama-2-7b-fast-instruct', 'llama.embedding_length': '4096', 'llama.tensor_data_layout': 'Meta AI original pth', 'llama.feed_forward_length': '11008', 'llama.attention.layer_norm_rms_epsilon': '0.000001', 'llama.rope.dimension_count': '128', 'tokenizer.ggml.bos_token_id': '1', 'llama.attention.head_count': '32', 'llama.block_count': '32', 'llama.attention.head_count_kv': '32', 'general.quantization_version': '2', 'tokenizer.ggml.model': 'llama'}
INFO:     Started server process [221]
INFO:     Waiting for application startup.
INFO:     Application startup complete.
INFO: Uvicorn running on http://0.0.0.0:8000 (Press CTRL+C to quit)- Access lcp[server] from your browser. When you access the URL below, the Swagger screen opens.
http://<IP address>:8000/docs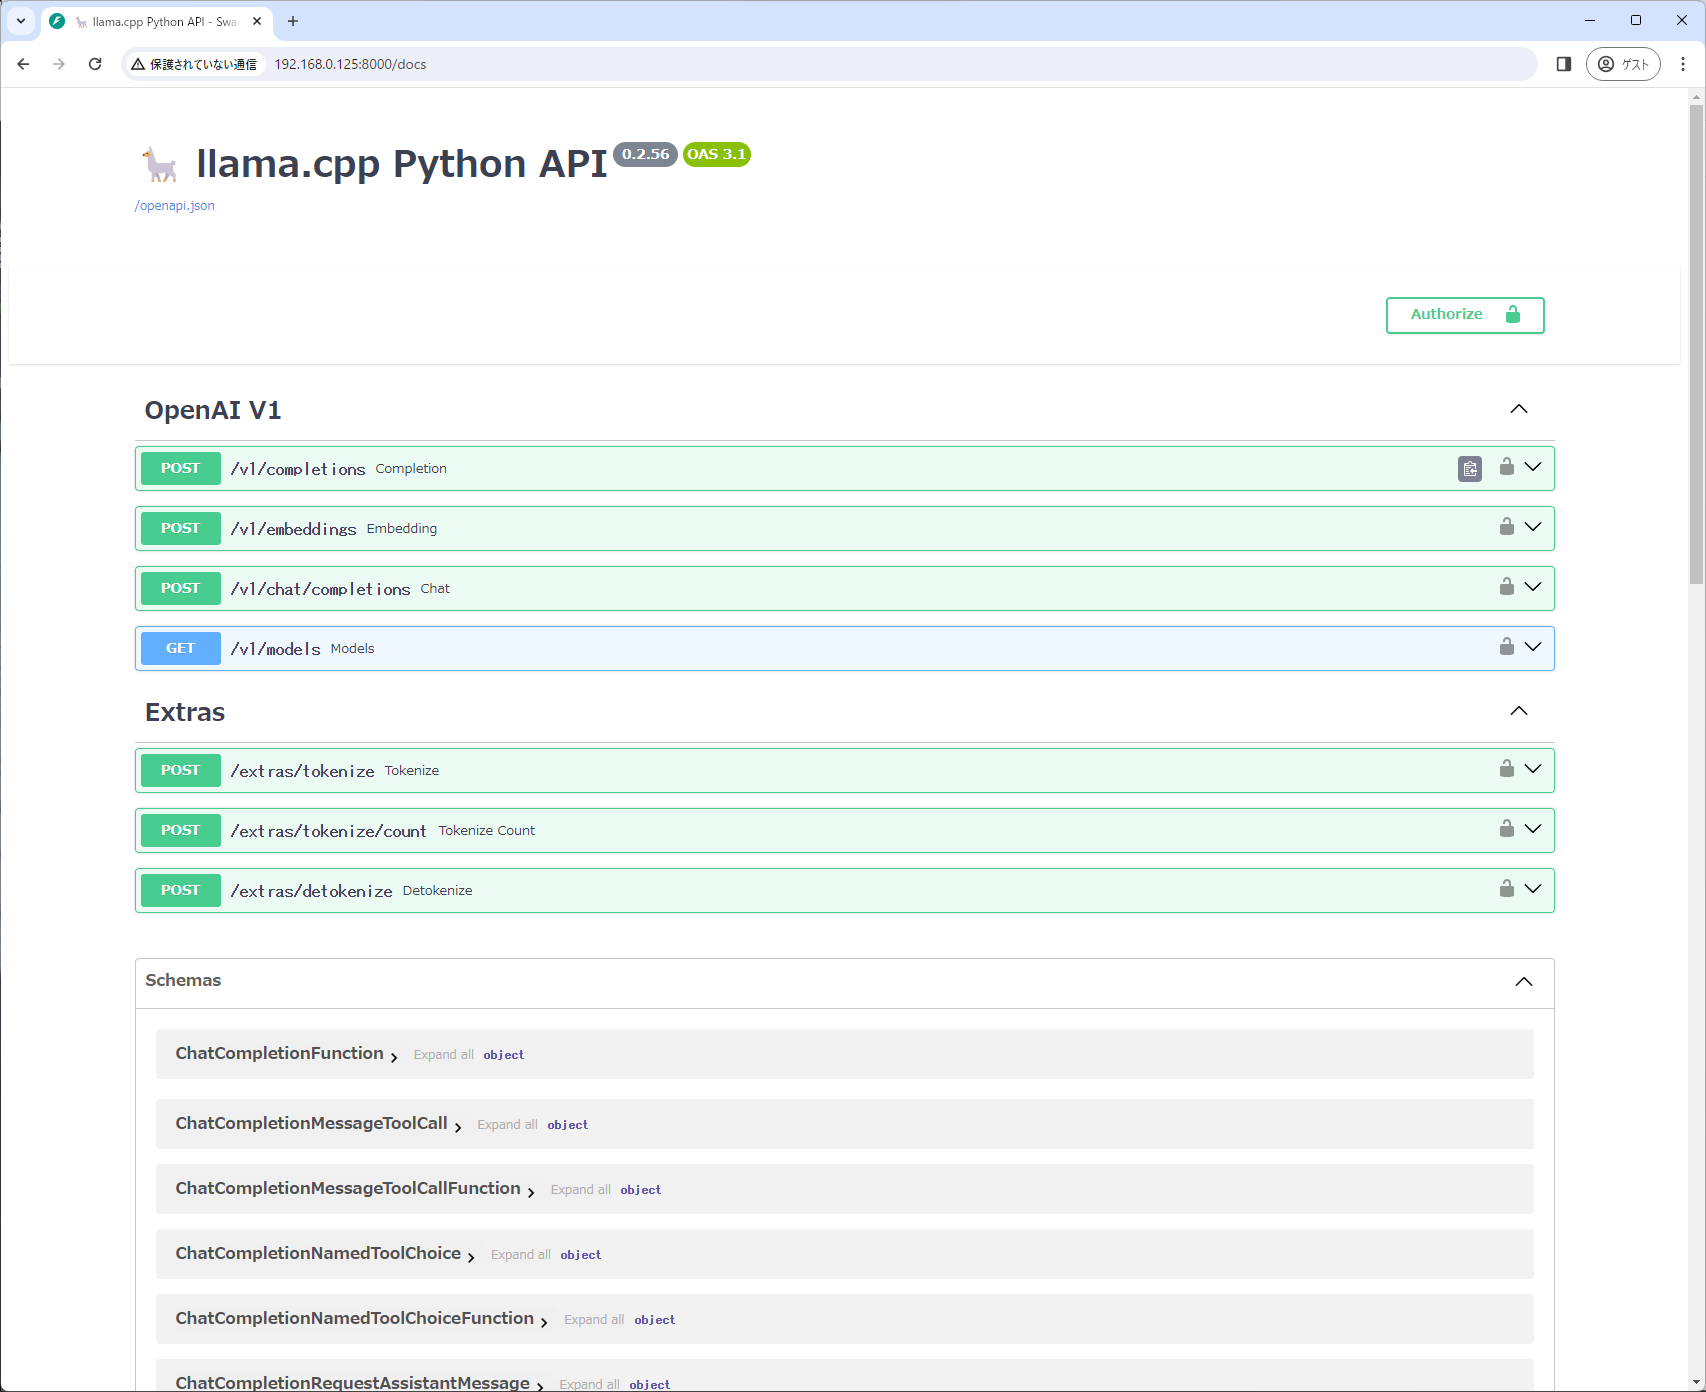
- Check that the multiple models are registered. Open “/v1/models” in OpenAI V1 and click “try it out” → “Execute”. If the configured models are displayed in “Response Body”, the check succeeded.
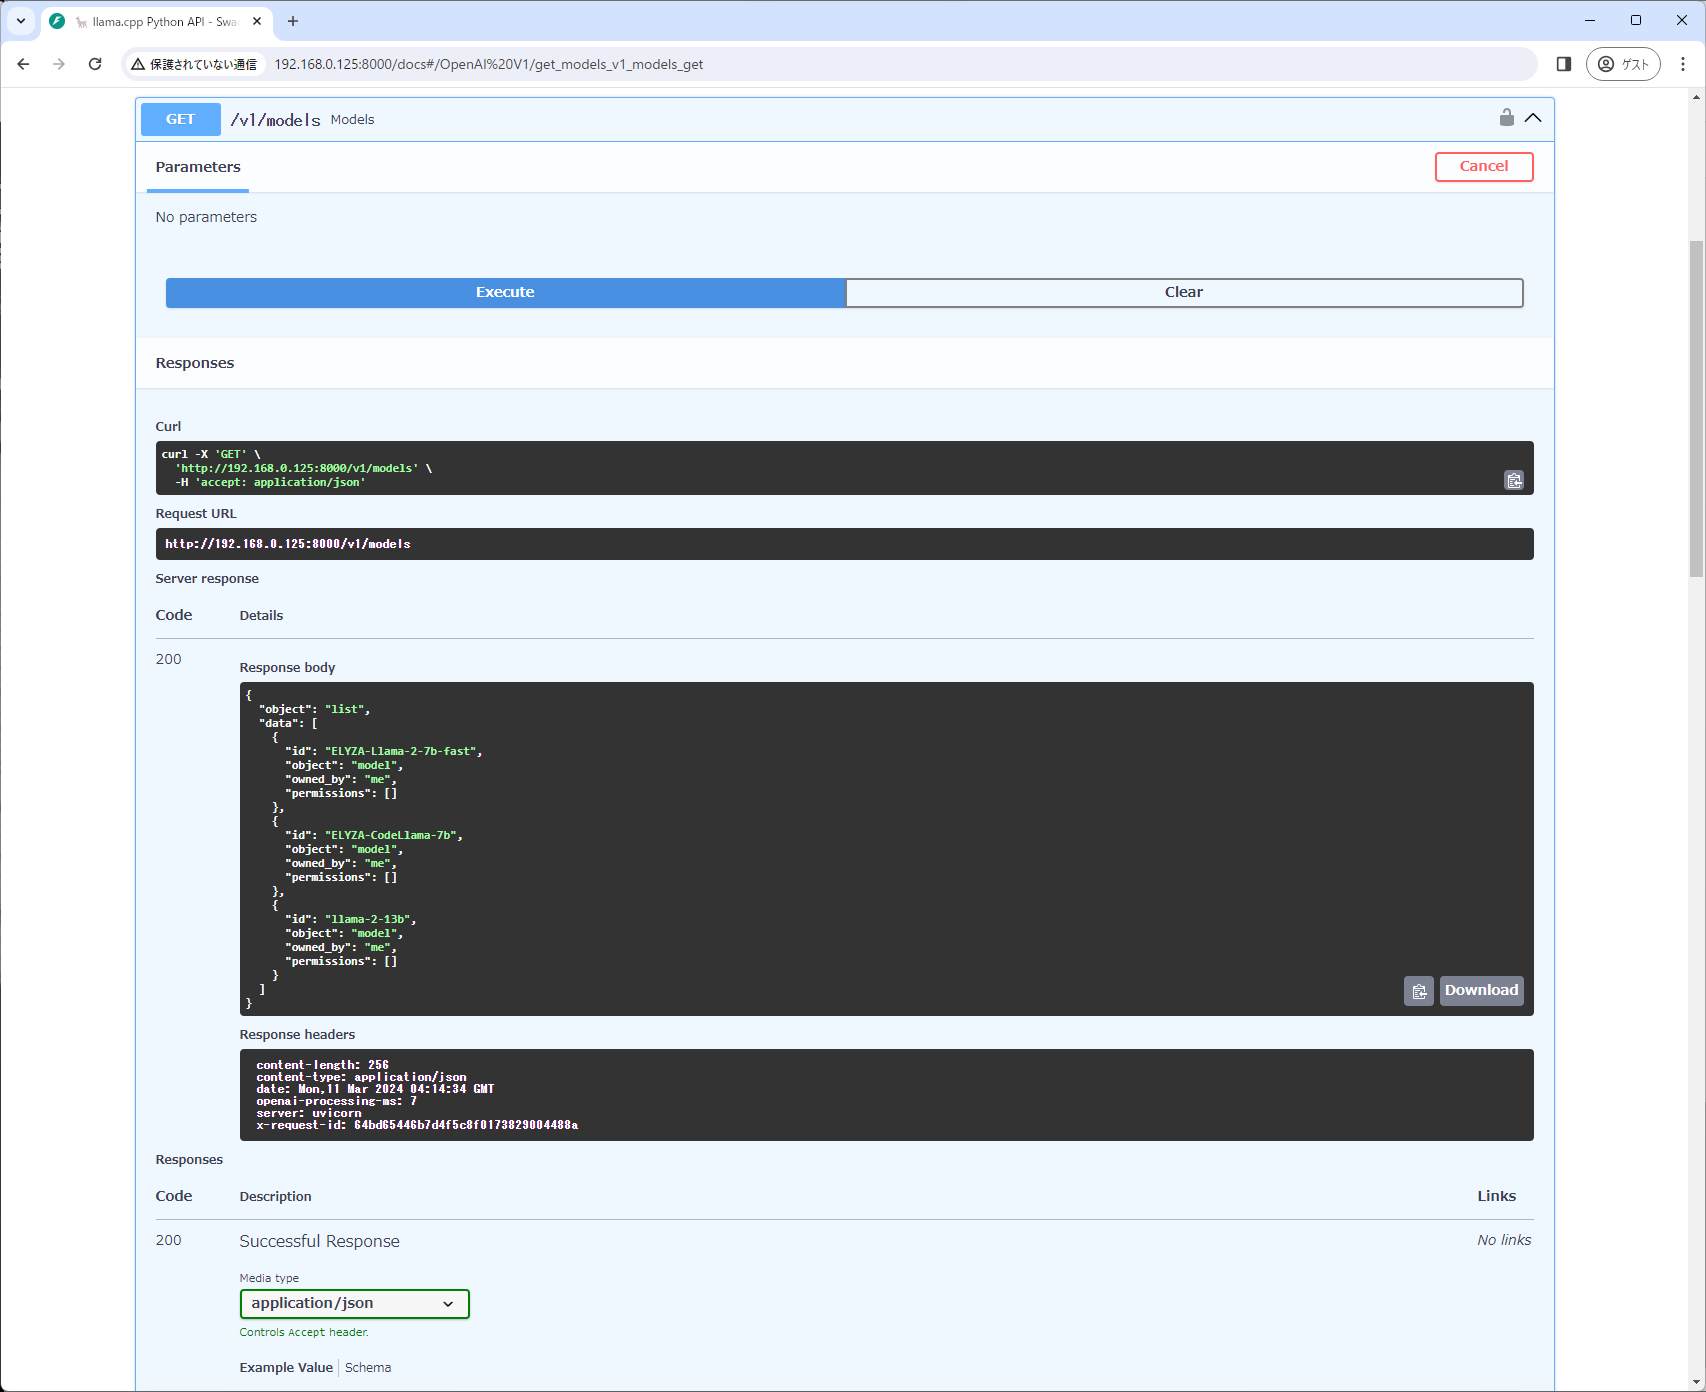
{
  "object": "list",
  "data": [
    {
      "id": "ELYZA-Llama-2-7b-fast",
      "object": "model",
      "owned_by": "me",
      "permissions": []
    },
    {
      "id": "ELYZA-CodeLlama-7b",
      "object": "model",
      "owned_by": "me",
      "permissions": []
    },
    {
      "id": "llama-2-13b",
      "object": "model",
      "owned_by": "me",
      "permissions": []
    }
  ]
}- The llama-cpp-python setup is now complete. To add another model, place it in the models directory, update the config file, and restart Docker.
Chatbot UI support for local LLMs
When using Chatbot UI with a local LLM, some code needs to be changed. I will introduce those changes here. The actual steps start in the “Building Chatbot UI” section. Feel free to skip this section.
Chatbot UI originally supports only OpenAI models and was not designed for local LLMs. Therefore, even if you build a local LLM server that is compatible with the OpenAI API, some functions do not work.
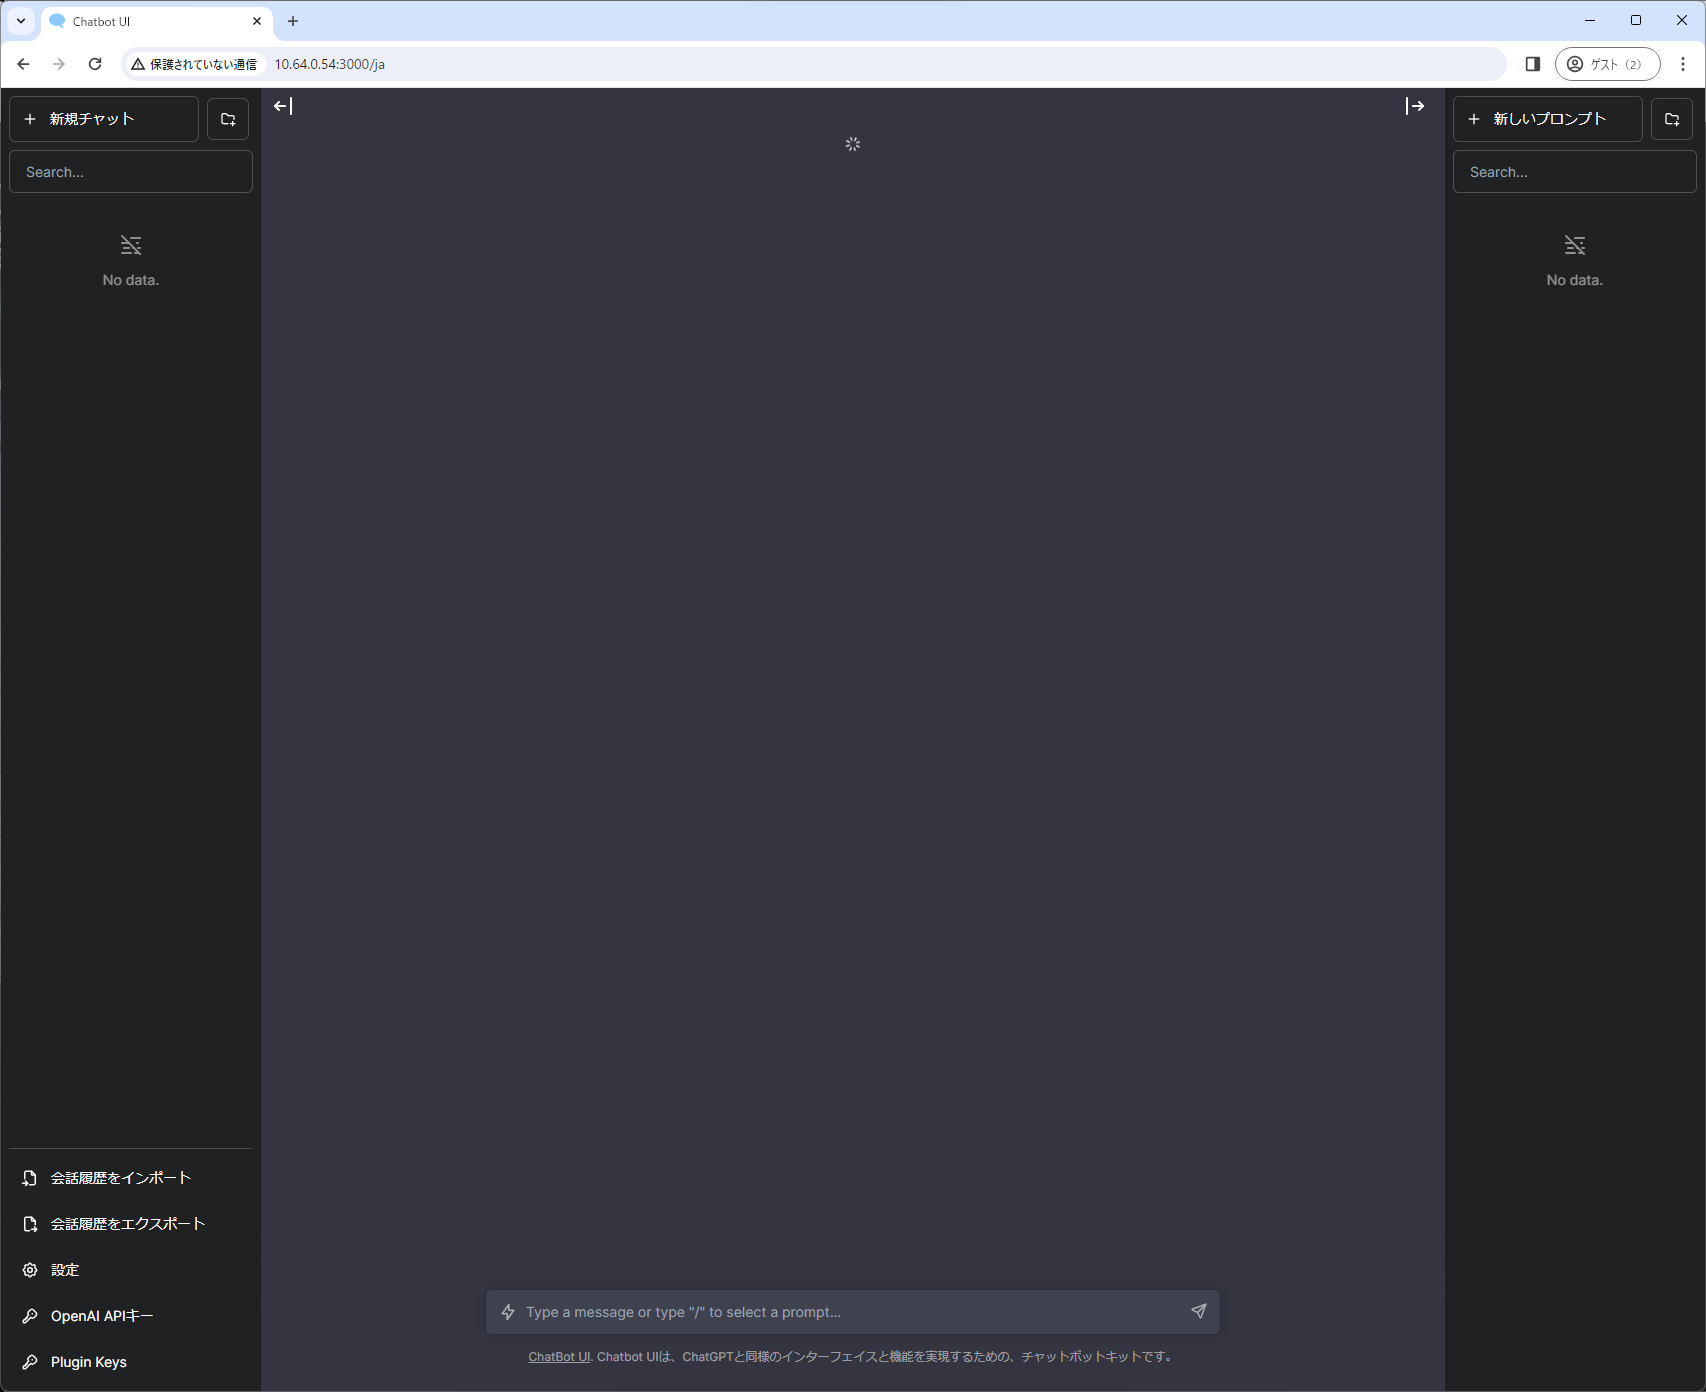
*The model selection screen does not appear and keeps loading forever.
To fix this, rewrite the code in pages/api/models.ts so that it can handle any model.
Before
    const models: OpenAIModel[] = json.data
      .map((model: any) => {
        for (const [key, value] of Object.entries(OpenAIModelID)) {
          if (value === model.id) {
            return {
              id: model.id,
              name: OpenAIModels[value].name,
            };
          }
        }
      })
      .filter(Boolean);
After
    const models = json.data.map((model: any) => ({
      id: model.id,
      name: model.id,
    }));
The original code only returns data when it matches one of the OpenAI models defined below. You could add local LLM information here, but that would not be very extensible, so I modified the code as shown above.
export interface OpenAIModel {
  id: string;
  name: string;
  maxLength: number; // maximum length of a message
  tokenLimit: number;
}

export enum OpenAIModelID {
  GPT_3_5 = 'gpt-3.5-turbo',
  GPT_4 = 'gpt-4',
}

// in case the `DEFAULT_MODEL` environment variable is not set or set to an unsupported model
export const fallbackModelID = OpenAIModelID.GPT_3_5;

export const OpenAIModels: Record<OpenAIModelID, OpenAIModel> = {
  [OpenAIModelID.GPT_3_5]: {
    id: OpenAIModelID.GPT_3_5,
    name: 'GPT-3.5',
    maxLength: 12000,
    tokenLimit: 4000,
  },
  [OpenAIModelID.GPT_4]: {
    id: OpenAIModelID.GPT_4,
    name: 'GPT-4',
    maxLength: 24000,
    tokenLimit: 8000,
  },
};
I forked this revised version of Chatbot UI to my repository. The following steps use that modified version. https://github.com/mckaywrigley/chatbot-ui/compare/legacy…MuNeNICK:chatbot-ui-local-llm:legacy
Building Chatbot UI
This section shows how to build Chatbot UI.
As mentioned earlier, these steps use the local-LLM-compatible version instead of the original.
The upstream project has released v2, but because it requires Supabase, this article uses the legacy version.
- Run the following command to build the Chatbot UI with Docker.
docker run -e OPENAI_API_HOST=<lcp[server] IP address:port> -e OPENAI_API_KEY=fake_key -e DEFAULT_SYSTEM_PROMPT="you are an excellent assistant" -p 3000:3000 munenick/chatbot-ui-local-llm- Access the web UI using the URL below.
http://<Chatbot UI IP address>:3000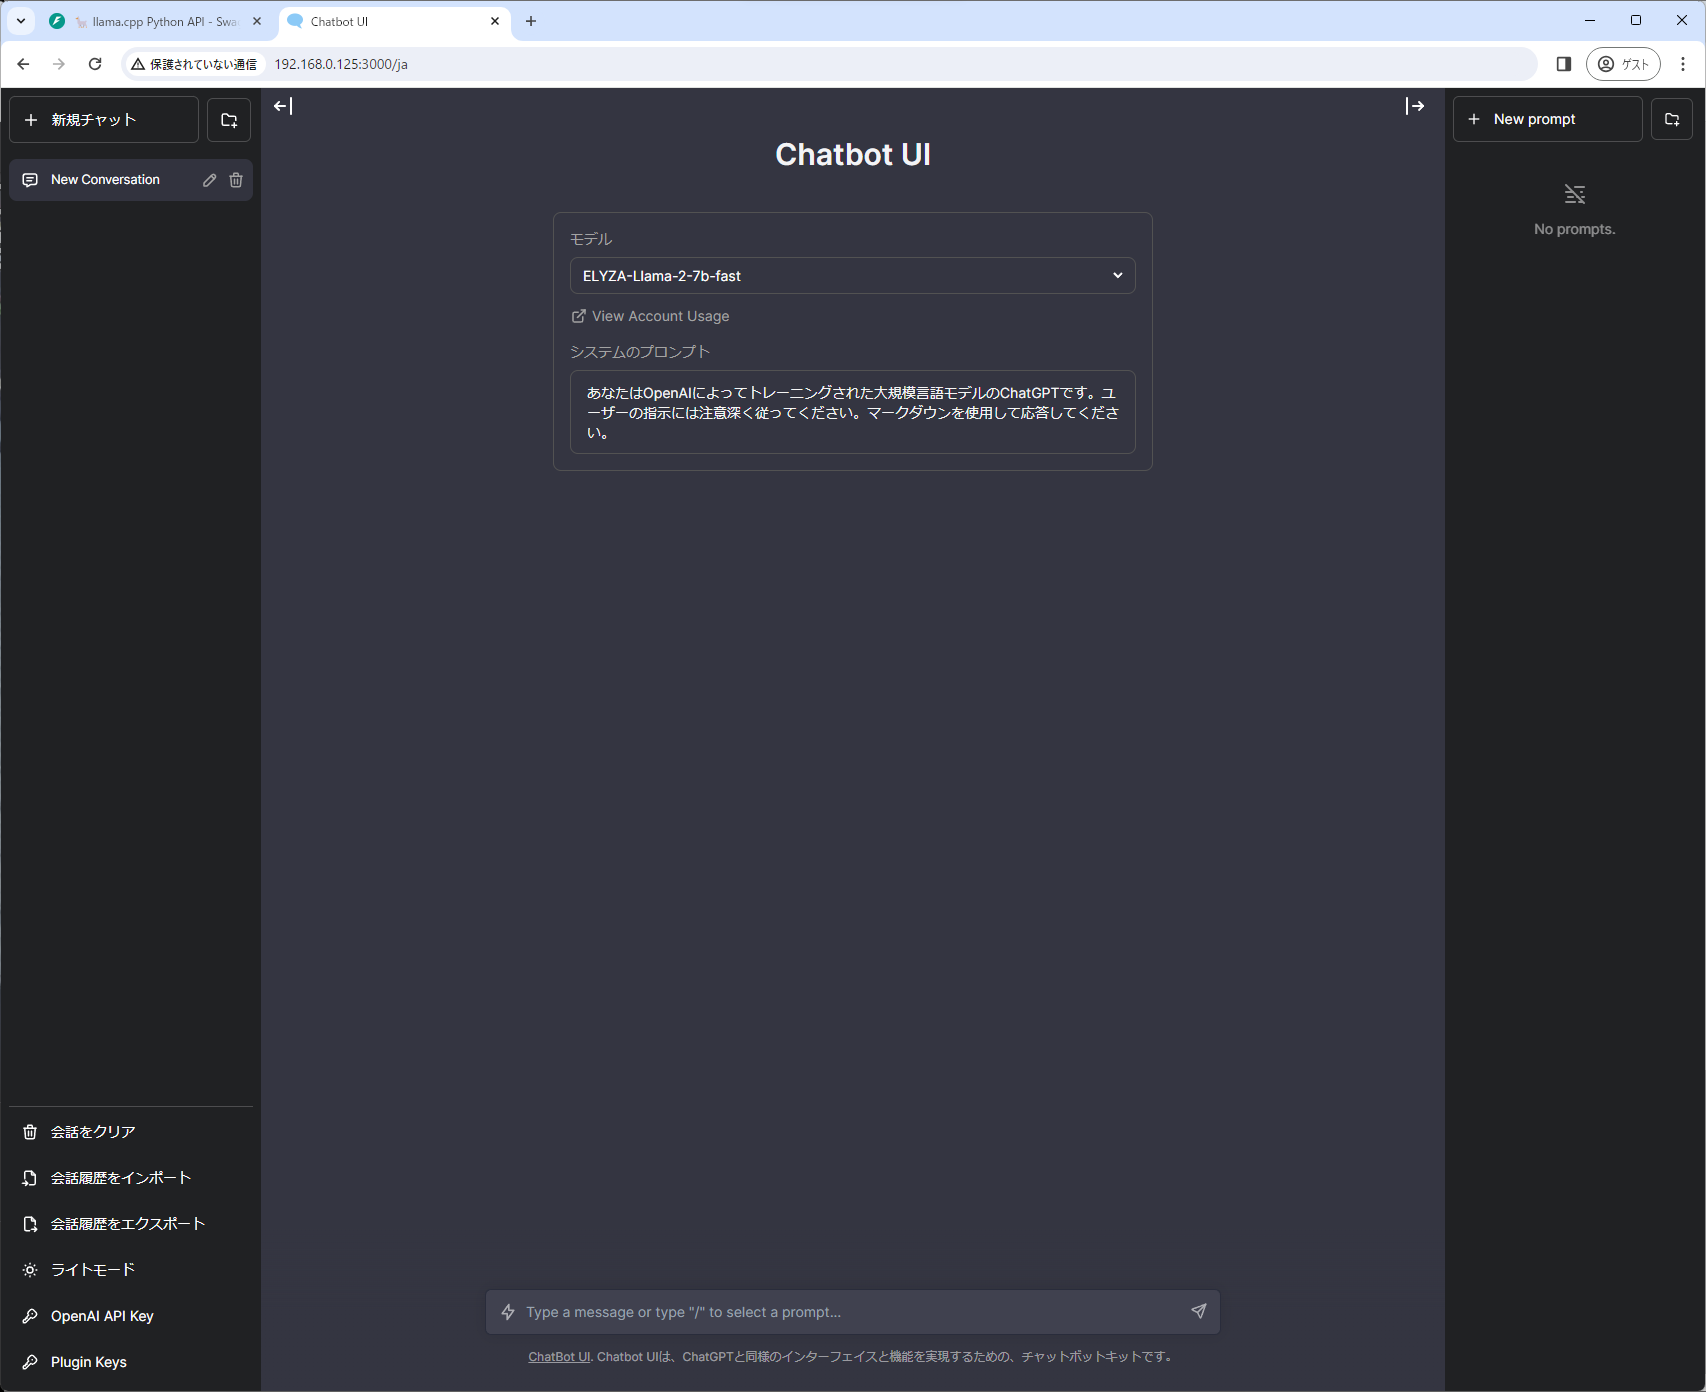
-
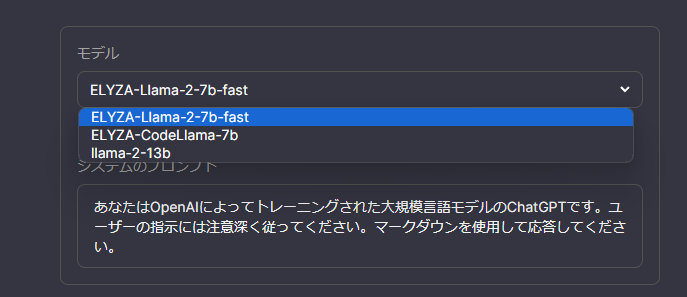
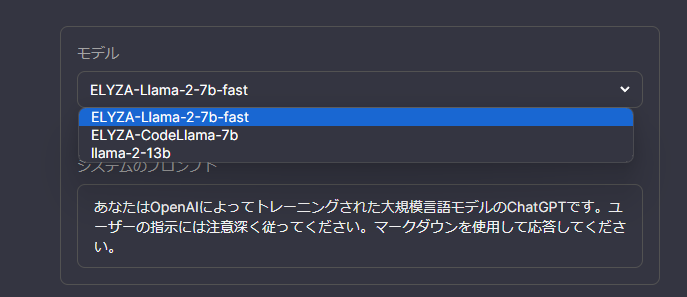
The setup succeeded if you can select one of the local models you configured.
-
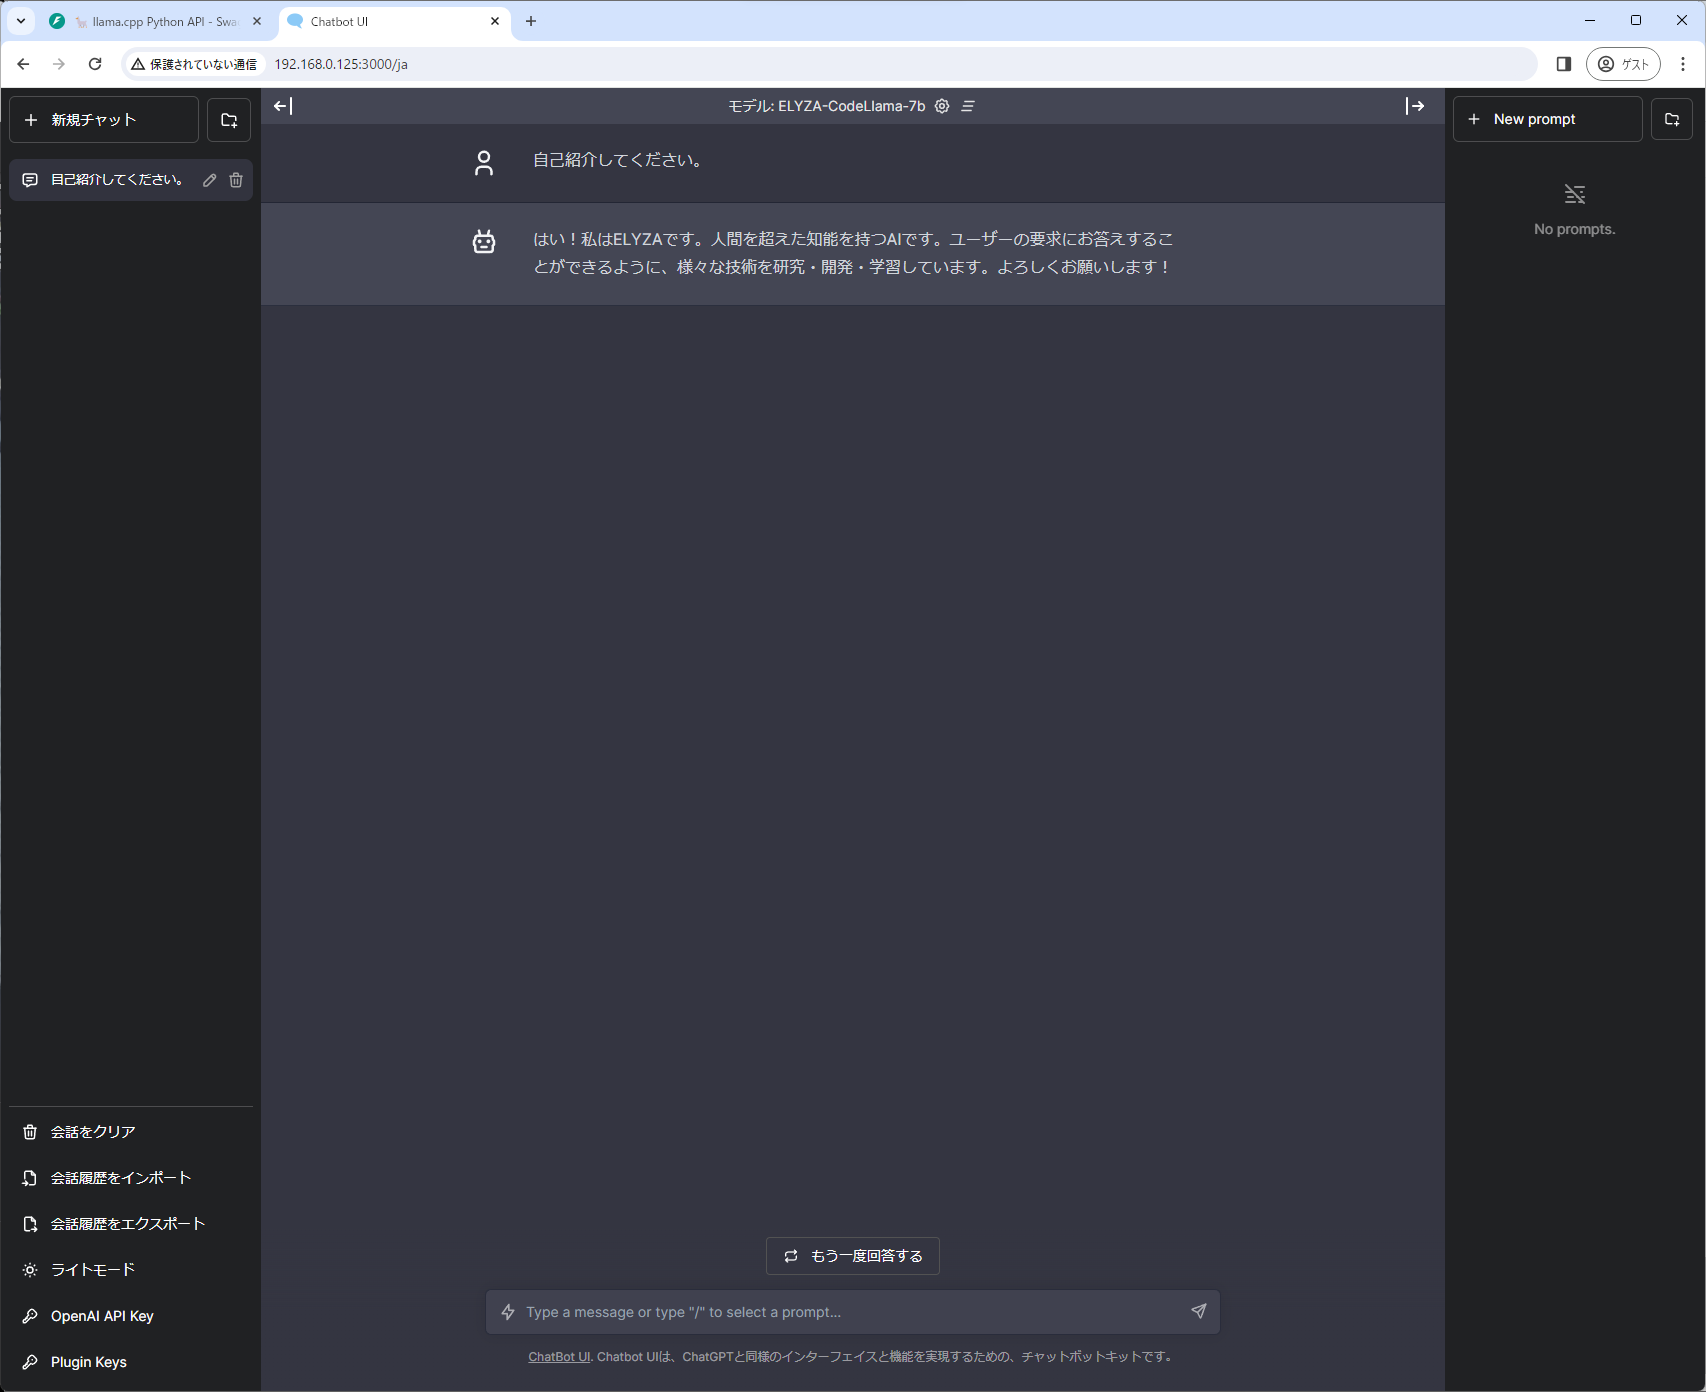
You should now be able to use chat as usual.
Build with Docker Compose
- If you build with Docker Compose, you can use the following:
version: '3.8'

services:
  chatbot-ui:
    image: munenick/chatbot-ui-local-llm
    ports:
      - "3000:3000"
    environment:
      OPENAI_API_HOST: "http://llama-cpp-python:8000"
      OPENAI_API_KEY: "fake_key"
      DEFAULT_SYSTEM_PROMPT: "You are a great assistant"

  llama-cpp-python:
    image: ghcr.io/abetlen/llama-cpp-python:latest
    ports:
      - "8000:8000"
    volumes:
      - "<Directory where models are located>:/models"
    environment:
CONFIG_FILE: "/models/model_config.json"- Start Docker Compose using the command below.
docker compose up -d- Access the web UI using the URL below.
http://<Chatbot UI IP address>:3000Conclusion
This article introduced how to use multiple local LLMs from a web UI with llama-cpp-python and Chatbot UI. Chatbot UI is a very well-made interface, but some functions did not work with local LLMs, so I modified the code.
If you are having trouble switching between multiple models with llama-cpp-python, or if you want a web UI for local LLMs, this setup may be useful.